Thursday, September 25, 2008

Auto formatting code in MonoDevelop 1.0

I struggled with keeping my code formatted correctly, especially for C# formatting standards (I'm a long-time Java developer). Artistic Style is an opensource code-formatter.

Here's how I was able to get MonoDevelop to auto-format my C# code. For MonoDevelop 1.0, it requires patching the source due to a Mono bug.

This patch will work easily on the MonoDevelop 1.0 sources.

Getting and Patching MonoDevelop Source
This is really just a workaround -- the real issue appears to be a problem with the Mono compiler, not with MonoDevelop. However, by adding a simple cast to an anonymous delegate, the compiler works fine.

Get the MonoDevelop 1.0 Source Tar Ball
$ wget http://go-mono.com/sources/monodevelop/monodevelop-1.0.tar.bz2
$ tar xfvj monodevelop-1.0.tar.bz2
Compile and run MonoDevelop
For me on Ubuntu, I had to install some dependencies. Most all of them were lib*-dev packages. Just run "./configure" and fix the dependencies until configure reports no errors. Once dependencies were sorted out, here's how I built and run it before making changes:
$ cd monodevelop-1.0
$ ./configure
$ make
$ make run
Apply the Patch and Recompile
The following patch simply adds a cast to the anonymous delegate as a work-around to the mono bug.

You can easily manually apply the patch by editing line 79 of src/core/MonoDevelop.Core/MonoDevelop.Core/StringParserService.cs and just casting the anonymous delegate to a GenerateString type:
stringGenerators [providedTag.ToUpper ()] = (GenerateString)delegate (string tag) {
Here's a patch file if you want to apply it automatically:

--- src/core/MonoDevelop.Core/MonoDevelop.Core/StringParserService.cs 2008-03-10 20:21:08.000000000 -0600
+++ src/core/MonoDevelop.Core/MonoDevelop.Core/StringParserService.cs 2008-09-25 10:42:48.000000000 -0600
@@ -76,7 +76,7 @@
public static void RegisterStringTagProvider (IStringTagProvider tagProvider)
{
foreach (string providedTag in tagProvider.Tags) {
- stringGenerators [providedTag.ToUpper ()] = delegate (string tag) {
+ stringGenerators [providedTag.ToUpper ()] = (GenerateString)delegate (string tag) {
return tagProvider.Convert (tag);
};
}


Apply the patch with the following commands (assuming patchfile.txt contains the above text!)
$ cd monodevelop-1.0
$ patch -p0 < patchfile.txt
Rebuild and Run MonoDevelop
Once you have MonoDevelop building, we can run it and hook astyle up to it.
$ make run
Artistic Style -- Astyle
The astyle executable must be installed, of course. On Ubuntu, I just installed the "astyle" package via "sudo apt-get install astyle". From the Artistic Style web site you can get whatever distribution you want, or build it from source.

Once it is installed on your system, make sure it is in your command path.

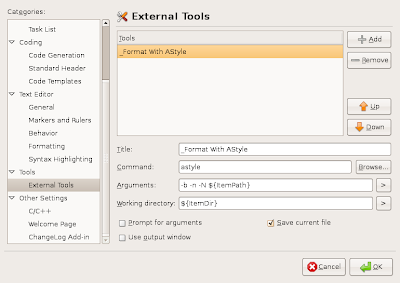
Configure MonoDevelop External Tool
  1. In MonoDevelop, go to Edit->Preferences...
  2. Drill down to Tools->External Tools (a minor bug in MonoDevelop forces you to select another node before you select "External Tools")
  3. Click the "Add" button and fill in the following information:
    Title: _Format with AStyle
    Command: astyle
    Arguments: -b -n -N ${ItemPath}
    Working Directory: ${ItemDir}
    Click "Save Current File"
  4. Click OK

You may want to add additional cmd line options. Please let me know if there are any others that should be used for C#!

Now, when editing a file, you can use Tools->Format with AStyle (or Alt-T, F). You will be prompted to re-load the changed file at the top of the editor window.

Tuesday, September 16, 2008

Stunnel

I mentioned stunnel in my Netcat post before. Stunnel is short for "universal SSL tunnel". It is a great utility for securing TCP/IP and HTTP(s) connections when an application doesn't have the ability (or doesn't want to deal with) secure transport layer security.

http://www.stunnel.org/

I use stunnel frequently when I want to trap an HTTPS request then replay it to another server. I can't just trap the HTTPS data as it is encrypted. Therefore, I modify my client to use HTTP, trap the plain-text HTTP request, then use stunnel to do the HTTPS for me.

Stunnel is available for immediate download for *nix, Cygwin and a native Windows port.

Configuring Stunnel
Stunnel 4.x is configured via a conf file which is specified as the main parameter on the command line (stunnel 3.x uses cmd-line options to configure it.)
$ stunnel my.conf
The configuration file stunnel uses is broken into two main parts -- Global Options and Service-Level Options.

Global Options dictate how stunnel behaves such as forked or not, logging location, logging levels, etc. Common Global options are:
  • debug = 0-7, where 0=[emergency], 7=[debug] . The default is 5, [notice]
  • foreground = yes|no. This dictates whether or not stunnel will fork the process into the background or stay in the foreground.
  • output = somefile. This is where output goes. /dev/stdout indicates to just output to STDOUT.
  • pid = somefile. If present, the name of the file to write the background process' pid.
  • taskbar=yes|no. Win32 only -- shows a taskbar icon you can use to control the running instance.
Service-Level options are for individual protocols such as https, imap, etc, and control the way the forwarding/proxying behave. Common service-level options are:
  • accept=port #. This is what port incoming connections will be accepted on. Only a single value can be given, but you are free to create multiple services as the following incomplete example shows:
    [https1]
    accept=9000
    connect=someserver:90

    [https2]
    accept=9001
    connect=someserver:91
  • cert=somecert.pem. This specifies where your certificate resides. In client mode (client=yes), this cert will be used for 2-way SSL.
  • connect=[host:]port. Where the backend resides.
  • key=keyfile.pem. This is the private key to be used for serving up SSL connections.
These are the only options we'll use in the examples below. RTFM for the other options. :)

Examples
1) Proxying Plain Text HTTP client Traffic to HTTPS Server
I use this feature a lot to debug client-side HTTP issues and to see the exact HTTP message on-the-wire. Basically, this is handy to do HTTP from your client, but convert to HTTPS before hitting the server.

All this entails is doing "pseudo-https" with the following stunnel configuration:
$ cat https.conf
foreground = yes
output = /dev/stdout
debug = 7

[psuedo-https]
accept = 9443
connect = localhost:443
client = yes
Then, your client can hit http://localhost:9443 which will be proxied to localhost:443 over SSL.

2) Creating an HTTPS Listener which Proxies to non-HTTP server
Requirement -- PEM-encoded file private key with signed certificate. The private key should not have a password on it. Both the private key AND the cert should be in the PEM-encoded file.

The stunnel conf looks like this to proxy incoming HTTPS requests to your local JBoss/Jetty/Tomcat service:
$ cat accept-https.conf
debug=7
output=/dev/stdout
foreground=yes

[stunnel]
cert=MyKeyFileWithCert.pem
accept=443
connect=8080
When you start stunnel with "stunnel accept-https.conf", you can test it with:
$curl --insecure https://localhost
Note that the "--insecure" option may be needed if the stunnel.pem file contains a cert signed by a non-trusted certificate authority. Likewise, in IE or Firefox, you'll need to add a security exception in order to test.

3) Load Balancing Incoming Connections
If multiple "connect" options are given for a service, then a round-robin algorithm is used to load-balance the back-end requests.

The following configuration will load balance incoming HTTP connects on port 80 to HTTPS ports 9080 and 9081.
$ cat loadbalance.conf
foreground=yes
output = /dev/stdout
debug = 7

[load-balance]
client=yes
accept = 80
connect = localhost:9080
connect = localhost:9081

Wednesday, September 10, 2008

Debugging with Netcat

Wanted to spotlight one of my favorite utlities -- NETCAT. It's probably my most favorite of utilities. I've used it for years in debugging network issues, especially web issues. It's been described as the "The TCP/IP Swiss Army Knife." It's very powerful.

I use it frequently to grab and send http requests. It allows you to see the exact bytes sent/received on the wire from your browser.

Using netcat to grab an http request
1) Start netcat in listen mode on a port and save the request.
$ nc -l -p 9999 | tee somerequest.http

2) Perform a sample HTTP request using browser: http://localhost:9999/index.html
3) View the request -- you'll see the entire http request payload (headers & content)
GET /index.html HTTP/1.1
Host: localhost:9999
User-Agent: Mozilla/5.0 (X11; U; Linux i686; en-US; rv:1.9.0.1) Gecko/2008072820 Firefox/3.0.1
Accept: text/html,application/xhtml+xml,application/xml;q=0.9,*/*;q=0.8
Accept-Language: en-us,en;q=0.5
Accept-Encoding: gzip,deflate
Accept-Charset: ISO-8859-1,utf-8;q=0.7,*;q=0.7
Keep-Alive: 300
Connection: keep-alive


Using netcat to play back an http request
Easy as capturing a request -- just redirect the saved HTTP request using:

$ nc www.google.com 80 < somerequest.http > someresponse.http

You may notice that the response looks garbled -- this is probably due to the fact that it is GZipped-encoded. Look for a header such as "Content-Encoding: gzip". You could re-submit the request after removing the "Accept-Encoding:" header and it will no longer be in gzip format.

Cool Things to Do to Impress Your Friends
1) Copy a file from 1 server to another
Netcat just reads & dumps byts to and from ports. Very simple. To copy a file from one server to another without using SSH/FTP/RCP/etc, just do this:
On the source server, just redirect a file to a port:
$ nc -l -p 9999 < somefile.txt

On the destination server, just connect to that port and redirect the bytes to a local file:
$ nc source.server.com 9999 > somefile.txt

You may want to do a checksum on the file to ensure contents were not modified or somehow broken.

2) Copy segments of a file (i.e., restarting a transfer)
If you are doing the above transfer and something occurred which caused network to fail, you can simply send just parts of the file and concatenate the new segments to the old file. You just need to know how may bytes the destination file already has, then use "dd" to strip them off. In the following example, the destination already had the first 12,000,150 bytes, so we will skip those.

$ dd bs=1 skip=12,000,150 if=somefile.txt | nc -l -p 9999

Then, just simply append the new contents to what you already have on the destination:
$ nc source.server.com 9999 >> somefile.txt

3) Give shell access
Netcat can be used to pipe STDIN/STDOUT to a process, too. This can be dangerous, but also powerful. :)

This example creates a network pipe to bash, so anyone connecting to the listener port will have the users bash command access:

$ nc -l -p 9999 -e /bin/bash

Probably, a better way to utilize this feature is to perform a quick backup of a directory. On the source server, type (the -q 5 options tells netcat to close the connection 5 seconds after reaching the EOF)

$ tar zcfv - somedir | nc -q 5 -l -p 9999

Then, on the destination server, type:

$ nc myserver.com 9999 > somedir.tar.gz

3b) If you have the "pv" utility installed, you can get progress information displayed to your terminal. Pv just displays information about the bytes traveling through a network pipe.

tar zcf - somedir | pv | nc -l -p 9999
61.3MB 0:00:30 [ 2MB/s] [ <=> ]

4) Port scanning
Netcat can act as a port-scanner, too.

$ nc -v -z localhost 1-100
localhost [127.0.0.1] 80 (www) open

What about HTTPS?
Stunnel is another one of my favorite utilities. It allows you to tunnel TCP/IP connections over SSL. It also can act as an HTTPS proxy so that you can stick with HTTP traffic locally, but switch to HTTPS when you put it on the wire.

This is very handy when you don't have control over the server and it only requests https, but you want to take a look at packets/http messages b/w your client and the server.

I'll do another post soon on how to use stunnel to handle https.

Alternatives
WireShark/Tcpdump -- Packet analyzer. Very nice and powerful (wireshark used to be called Ethereal)
TcpMon -- was bundled with earlier version of Axis 1.x, but not sure where it went now? -- just sat in the middle b/w TCP/IP connections and listened, logged, and fwded in real time.
Firebug Firefox plugin -- Nice for HTTP debugging.

Tuesday, September 09, 2008

RXVT and Cygwin

I don't like the dos-window that Cygwin launches in by default. Instead, I install the RXVT package.

Benefits:
1) Copy and paste doesn't break lines.
2) Completely customizable xterm-like window (scrollbars, colors, sizes, etc)
3) Completely resizable to almost your entire screen (nice for tailing log files, looking at exception stack traces, etc)
4) More pleasing

Dislikes:
1) About the only thing I have found that I don't like about RXVT (which I bet there is a solution for) is that it uses middle-mouse to paste. Since I use Putty a lot, and Putty uses right-mouse to paste, I always get them mixed up and end up doing the wrong darn thing.

Installation and Configuration:
1) Run the Cygwin setup app -- http://cygwin.com/setup.exe
2) Install the RXVT package
3) Create a new shortcut for "E:\cygwin\bin\rxvt.exe -e /bin/bash -login"
4) Create .Xresources file in your Cygwin $HOME dir:


rxvt.font: Lucida Console-12
rxvt.boldFont: Lucida Console-12
rxvt.scrollBar: True
rxvt.visualBell: True
rxvt.loginShell: True
rxvt.background: Black
rxvt.foreground: White
rxvt.saveLines: 3000
rxvt.cursorColor: Green
rxvt.scrollBar_right: True
rxvt.geometry: 125x50


That's it. An alternative option is to specify all the options on the rxvt cmd line.

Update: I was curious to see if there was an easy way to change PASTE from middle-click to right-click. Found this posting, but it requires you to compile RXVT from source: http://mpuentes.blogspot.com/2007/11/cygwin-rxvt.html

Thursday, September 04, 2008

Necessary Software

Here's a quick list of the software I use on an everyday basis. These are the "necessities" I quickly grab when I re-install a new host or guest OS:

Windows

  • Firefox
      Plugins:
    • Firebug
    • Foxmarks
    • FoxyProxy

  • 7-zip
  • Putty
  • TortoiseSVN
  • Wireshark
  • JDK
  • Eclipse
  • Launchy
  • NotePad++
  • SysExplorer (and other sysinternals utils such as tcpview and tcpvcon)
  • LDAP Browser
  • Cygwin
      Packages:
    • Netcat
    • wget
    • curl
    • Perl (and perl_manpages)
    • chere
    • rxvt
    • git and subversion
    • openssh
    • openssl
    • rsync
    • screen
    • stunnel
    • vim
    • wtf

  • VirtualCD (from Microsoft MSDN)
  • Synergy (as client)


Linux

  • VirtualBox
  • All of the cygwin packages above, if not already installed.
  • Firefox
  • Synergy (as server)
  • Pidgin