Thursday, September 25, 2008

Auto formatting code in MonoDevelop 1.0

I struggled with keeping my code formatted correctly, especially for C# formatting standards (I'm a long-time Java developer). Artistic Style is an opensource code-formatter.

Here's how I was able to get MonoDevelop to auto-format my C# code. For MonoDevelop 1.0, it requires patching the source due to a Mono bug.

This patch will work easily on the MonoDevelop 1.0 sources.

Getting and Patching MonoDevelop Source
This is really just a workaround -- the real issue appears to be a problem with the Mono compiler, not with MonoDevelop. However, by adding a simple cast to an anonymous delegate, the compiler works fine.

Get the MonoDevelop 1.0 Source Tar Ball
$ wget http://go-mono.com/sources/monodevelop/monodevelop-1.0.tar.bz2
$ tar xfvj monodevelop-1.0.tar.bz2
Compile and run MonoDevelop
For me on Ubuntu, I had to install some dependencies. Most all of them were lib*-dev packages. Just run "./configure" and fix the dependencies until configure reports no errors. Once dependencies were sorted out, here's how I built and run it before making changes:
$ cd monodevelop-1.0
$ ./configure
$ make
$ make run
Apply the Patch and Recompile
The following patch simply adds a cast to the anonymous delegate as a work-around to the mono bug.

You can easily manually apply the patch by editing line 79 of src/core/MonoDevelop.Core/MonoDevelop.Core/StringParserService.cs and just casting the anonymous delegate to a GenerateString type:
stringGenerators [providedTag.ToUpper ()] = (GenerateString)delegate (string tag) {
Here's a patch file if you want to apply it automatically:

--- src/core/MonoDevelop.Core/MonoDevelop.Core/StringParserService.cs 2008-03-10 20:21:08.000000000 -0600
+++ src/core/MonoDevelop.Core/MonoDevelop.Core/StringParserService.cs 2008-09-25 10:42:48.000000000 -0600
@@ -76,7 +76,7 @@
public static void RegisterStringTagProvider (IStringTagProvider tagProvider)
{
foreach (string providedTag in tagProvider.Tags) {
- stringGenerators [providedTag.ToUpper ()] = delegate (string tag) {
+ stringGenerators [providedTag.ToUpper ()] = (GenerateString)delegate (string tag) {
return tagProvider.Convert (tag);
};
}


Apply the patch with the following commands (assuming patchfile.txt contains the above text!)
$ cd monodevelop-1.0
$ patch -p0 < patchfile.txt
Rebuild and Run MonoDevelop
Once you have MonoDevelop building, we can run it and hook astyle up to it.
$ make run
Artistic Style -- Astyle
The astyle executable must be installed, of course. On Ubuntu, I just installed the "astyle" package via "sudo apt-get install astyle". From the Artistic Style web site you can get whatever distribution you want, or build it from source.

Once it is installed on your system, make sure it is in your command path.

Configure MonoDevelop External Tool
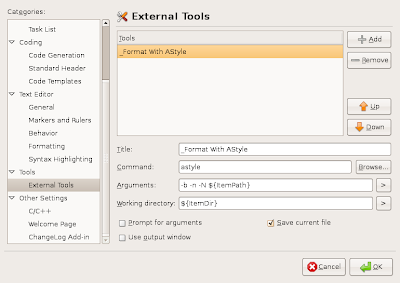
  1. In MonoDevelop, go to Edit->Preferences...
  2. Drill down to Tools->External Tools (a minor bug in MonoDevelop forces you to select another node before you select "External Tools")
  3. Click the "Add" button and fill in the following information:
    Title: _Format with AStyle
    Command: astyle
    Arguments: -b -n -N ${ItemPath}
    Working Directory: ${ItemDir}
    Click "Save Current File"
  4. Click OK

You may want to add additional cmd line options. Please let me know if there are any others that should be used for C#!

Now, when editing a file, you can use Tools->Format with AStyle (or Alt-T, F). You will be prompted to re-load the changed file at the top of the editor window.

Tuesday, September 16, 2008

Stunnel

I mentioned stunnel in my Netcat post before. Stunnel is short for "universal SSL tunnel". It is a great utility for securing TCP/IP and HTTP(s) connections when an application doesn't have the ability (or doesn't want to deal with) secure transport layer security.

http://www.stunnel.org/

I use stunnel frequently when I want to trap an HTTPS request then replay it to another server. I can't just trap the HTTPS data as it is encrypted. Therefore, I modify my client to use HTTP, trap the plain-text HTTP request, then use stunnel to do the HTTPS for me.

Stunnel is available for immediate download for *nix, Cygwin and a native Windows port.

Configuring Stunnel
Stunnel 4.x is configured via a conf file which is specified as the main parameter on the command line (stunnel 3.x uses cmd-line options to configure it.)
$ stunnel my.conf
The configuration file stunnel uses is broken into two main parts -- Global Options and Service-Level Options.

Global Options dictate how stunnel behaves such as forked or not, logging location, logging levels, etc. Common Global options are:
  • debug = 0-7, where 0=[emergency], 7=[debug] . The default is 5, [notice]
  • foreground = yes|no. This dictates whether or not stunnel will fork the process into the background or stay in the foreground.
  • output = somefile. This is where output goes. /dev/stdout indicates to just output to STDOUT.
  • pid = somefile. If present, the name of the file to write the background process' pid.
  • taskbar=yes|no. Win32 only -- shows a taskbar icon you can use to control the running instance.
Service-Level options are for individual protocols such as https, imap, etc, and control the way the forwarding/proxying behave. Common service-level options are:
  • accept=port #. This is what port incoming connections will be accepted on. Only a single value can be given, but you are free to create multiple services as the following incomplete example shows:
    [https1]
    accept=9000
    connect=someserver:90

    [https2]
    accept=9001
    connect=someserver:91
  • cert=somecert.pem. This specifies where your certificate resides. In client mode (client=yes), this cert will be used for 2-way SSL.
  • connect=[host:]port. Where the backend resides.
  • key=keyfile.pem. This is the private key to be used for serving up SSL connections.
These are the only options we'll use in the examples below. RTFM for the other options. :)

Examples
1) Proxying Plain Text HTTP client Traffic to HTTPS Server
I use this feature a lot to debug client-side HTTP issues and to see the exact HTTP message on-the-wire. Basically, this is handy to do HTTP from your client, but convert to HTTPS before hitting the server.

All this entails is doing "pseudo-https" with the following stunnel configuration:
$ cat https.conf
foreground = yes
output = /dev/stdout
debug = 7

[psuedo-https]
accept = 9443
connect = localhost:443
client = yes
Then, your client can hit http://localhost:9443 which will be proxied to localhost:443 over SSL.

2) Creating an HTTPS Listener which Proxies to non-HTTP server
Requirement -- PEM-encoded file private key with signed certificate. The private key should not have a password on it. Both the private key AND the cert should be in the PEM-encoded file.

The stunnel conf looks like this to proxy incoming HTTPS requests to your local JBoss/Jetty/Tomcat service:
$ cat accept-https.conf
debug=7
output=/dev/stdout
foreground=yes

[stunnel]
cert=MyKeyFileWithCert.pem
accept=443
connect=8080
When you start stunnel with "stunnel accept-https.conf", you can test it with:
$curl --insecure https://localhost
Note that the "--insecure" option may be needed if the stunnel.pem file contains a cert signed by a non-trusted certificate authority. Likewise, in IE or Firefox, you'll need to add a security exception in order to test.

3) Load Balancing Incoming Connections
If multiple "connect" options are given for a service, then a round-robin algorithm is used to load-balance the back-end requests.

The following configuration will load balance incoming HTTP connects on port 80 to HTTPS ports 9080 and 9081.
$ cat loadbalance.conf
foreground=yes
output = /dev/stdout
debug = 7

[load-balance]
client=yes
accept = 80
connect = localhost:9080
connect = localhost:9081

Wednesday, September 10, 2008

Debugging with Netcat

Wanted to spotlight one of my favorite utlities -- NETCAT. It's probably my most favorite of utilities. I've used it for years in debugging network issues, especially web issues. It's been described as the "The TCP/IP Swiss Army Knife." It's very powerful.

I use it frequently to grab and send http requests. It allows you to see the exact bytes sent/received on the wire from your browser.

Using netcat to grab an http request
1) Start netcat in listen mode on a port and save the request.
$ nc -l -p 9999 | tee somerequest.http

2) Perform a sample HTTP request using browser: http://localhost:9999/index.html
3) View the request -- you'll see the entire http request payload (headers & content)
GET /index.html HTTP/1.1
Host: localhost:9999
User-Agent: Mozilla/5.0 (X11; U; Linux i686; en-US; rv:1.9.0.1) Gecko/2008072820 Firefox/3.0.1
Accept: text/html,application/xhtml+xml,application/xml;q=0.9,*/*;q=0.8
Accept-Language: en-us,en;q=0.5
Accept-Encoding: gzip,deflate
Accept-Charset: ISO-8859-1,utf-8;q=0.7,*;q=0.7
Keep-Alive: 300
Connection: keep-alive


Using netcat to play back an http request
Easy as capturing a request -- just redirect the saved HTTP request using:

$ nc www.google.com 80 < somerequest.http > someresponse.http

You may notice that the response looks garbled -- this is probably due to the fact that it is GZipped-encoded. Look for a header such as "Content-Encoding: gzip". You could re-submit the request after removing the "Accept-Encoding:" header and it will no longer be in gzip format.

Cool Things to Do to Impress Your Friends
1) Copy a file from 1 server to another
Netcat just reads & dumps byts to and from ports. Very simple. To copy a file from one server to another without using SSH/FTP/RCP/etc, just do this:
On the source server, just redirect a file to a port:
$ nc -l -p 9999 < somefile.txt

On the destination server, just connect to that port and redirect the bytes to a local file:
$ nc source.server.com 9999 > somefile.txt

You may want to do a checksum on the file to ensure contents were not modified or somehow broken.

2) Copy segments of a file (i.e., restarting a transfer)
If you are doing the above transfer and something occurred which caused network to fail, you can simply send just parts of the file and concatenate the new segments to the old file. You just need to know how may bytes the destination file already has, then use "dd" to strip them off. In the following example, the destination already had the first 12,000,150 bytes, so we will skip those.

$ dd bs=1 skip=12,000,150 if=somefile.txt | nc -l -p 9999

Then, just simply append the new contents to what you already have on the destination:
$ nc source.server.com 9999 >> somefile.txt

3) Give shell access
Netcat can be used to pipe STDIN/STDOUT to a process, too. This can be dangerous, but also powerful. :)

This example creates a network pipe to bash, so anyone connecting to the listener port will have the users bash command access:

$ nc -l -p 9999 -e /bin/bash

Probably, a better way to utilize this feature is to perform a quick backup of a directory. On the source server, type (the -q 5 options tells netcat to close the connection 5 seconds after reaching the EOF)

$ tar zcfv - somedir | nc -q 5 -l -p 9999

Then, on the destination server, type:

$ nc myserver.com 9999 > somedir.tar.gz

3b) If you have the "pv" utility installed, you can get progress information displayed to your terminal. Pv just displays information about the bytes traveling through a network pipe.

tar zcf - somedir | pv | nc -l -p 9999
61.3MB 0:00:30 [ 2MB/s] [ <=> ]

4) Port scanning
Netcat can act as a port-scanner, too.

$ nc -v -z localhost 1-100
localhost [127.0.0.1] 80 (www) open

What about HTTPS?
Stunnel is another one of my favorite utilities. It allows you to tunnel TCP/IP connections over SSL. It also can act as an HTTPS proxy so that you can stick with HTTP traffic locally, but switch to HTTPS when you put it on the wire.

This is very handy when you don't have control over the server and it only requests https, but you want to take a look at packets/http messages b/w your client and the server.

I'll do another post soon on how to use stunnel to handle https.

Alternatives
WireShark/Tcpdump -- Packet analyzer. Very nice and powerful (wireshark used to be called Ethereal)
TcpMon -- was bundled with earlier version of Axis 1.x, but not sure where it went now? -- just sat in the middle b/w TCP/IP connections and listened, logged, and fwded in real time.
Firebug Firefox plugin -- Nice for HTTP debugging.

Tuesday, September 09, 2008

RXVT and Cygwin

I don't like the dos-window that Cygwin launches in by default. Instead, I install the RXVT package.

Benefits:
1) Copy and paste doesn't break lines.
2) Completely customizable xterm-like window (scrollbars, colors, sizes, etc)
3) Completely resizable to almost your entire screen (nice for tailing log files, looking at exception stack traces, etc)
4) More pleasing

Dislikes:
1) About the only thing I have found that I don't like about RXVT (which I bet there is a solution for) is that it uses middle-mouse to paste. Since I use Putty a lot, and Putty uses right-mouse to paste, I always get them mixed up and end up doing the wrong darn thing.

Installation and Configuration:
1) Run the Cygwin setup app -- http://cygwin.com/setup.exe
2) Install the RXVT package
3) Create a new shortcut for "E:\cygwin\bin\rxvt.exe -e /bin/bash -login"
4) Create .Xresources file in your Cygwin $HOME dir:


rxvt.font: Lucida Console-12
rxvt.boldFont: Lucida Console-12
rxvt.scrollBar: True
rxvt.visualBell: True
rxvt.loginShell: True
rxvt.background: Black
rxvt.foreground: White
rxvt.saveLines: 3000
rxvt.cursorColor: Green
rxvt.scrollBar_right: True
rxvt.geometry: 125x50


That's it. An alternative option is to specify all the options on the rxvt cmd line.

Update: I was curious to see if there was an easy way to change PASTE from middle-click to right-click. Found this posting, but it requires you to compile RXVT from source: http://mpuentes.blogspot.com/2007/11/cygwin-rxvt.html

Thursday, September 04, 2008

Necessary Software

Here's a quick list of the software I use on an everyday basis. These are the "necessities" I quickly grab when I re-install a new host or guest OS:

Windows

  • Firefox
      Plugins:
    • Firebug
    • Foxmarks
    • FoxyProxy

  • 7-zip
  • Putty
  • TortoiseSVN
  • Wireshark
  • JDK
  • Eclipse
  • Launchy
  • NotePad++
  • SysExplorer (and other sysinternals utils such as tcpview and tcpvcon)
  • LDAP Browser
  • Cygwin
      Packages:
    • Netcat
    • wget
    • curl
    • Perl (and perl_manpages)
    • chere
    • rxvt
    • git and subversion
    • openssh
    • openssl
    • rsync
    • screen
    • stunnel
    • vim
    • wtf

  • VirtualCD (from Microsoft MSDN)
  • Synergy (as client)


Linux

  • VirtualBox
  • All of the cygwin packages above, if not already installed.
  • Firefox
  • Synergy (as server)
  • Pidgin

Thursday, May 01, 2008

Using VisualStudio Express and BTs SDK

I've seen a lot of posts regarding BT's Web21C SDK and using it with VisualStudio Express. Here's a quick "how-to" to get an example running.

Here's a working solution I used to do the following steps (may even work in VisualStudio Pro): http://dustin.breese.googlepages.com/SampleVisualStudioExpress.zip

1) Download and install VSExpress Edition 2008 from http://www.microsoft.com/express/download/default.aspx

2) Download and extract latest .NET SDK (5.2.1 in this example) from http://web21c.bt.com

3) Create a new Visual Studio Project (File->New Project...). Make it a Console Application.

4) Right click on "References" and select "Add reference...".

5) Select the Browse tab and browse to where you extracted the BT SDK and drill down to the libraries folder.

6) Select the "BT.Sdk.Core*" and whatever else library you want to use. In this example, I just selected "BT.Sdk.MessagingOneWayCapability" which brings in the code to send an SMS text message.

7) Go to web21c.bt.com and generate a new certificate and keypair via https://web21c.bt.com/registered_applications/new

8) Copy the pfx file (don't forget your pwd!) into the project. Right click and "Include in project". Make sure it's properties are set to "Copy To Output Directory = Always"

9) Copy in the *.cer files from the directory where you extracted the SDK. They are located under the "certs" directory. Right click and "Include in Project". Also make sure that the properties are set to "Copy to Output Directory = Always"

10) Right click the Project and select "Add->New Item...". Select "Application Configuration and name the file App.config

11) Add the following content, making sure to set certFile and certPassword to YOUR values (see next step). To access "Oaktree/Production", you will also need to top-up your account with credits from the portal. To access "Acorn/Sandbox", you can only send limited messages and do limited things.


<appSettings>
<add key="certFile" value="mycert.pfx"/>
<add key="certPassword" value="yourpwd"/>
<add key="serverCertFile" value="btsdkservercert-oaktree.cer"/>
<add key="Web21c_Environment" value="production"/>
</appSettings>

<system.web>
<webServices>
<soapExtensionTypes>
<add type="BT.Sdk.Core.Web21cSoapExtension, BT.Sdk.Core"/>
</soapExtensionTypes>
</webServices>
</system.web>


12) Now, open up Program.cs and enter the following for the Main method:


static void Main(string[] args)
{
BT.Sdk.Messaging.OneWayCapability.MessagingOneWayManager mgr = new BT.Sdk.Messaging.OneWayCapability.MessagingOneWayManager();
mgr.SendMessage("tel:+yourNBRincludingcountrycode", "Testing from VS Express!");
}


13) There is no step 13 as that is unlucky.

13.5) Expand the References and remove and re-add the BT* references by right clicking and drilling down to the Libraries subdirectory in the location where you installed the Web21CSDK.

14) Run and it should work. If an exception occurs, cd into the Bin/Debug directory and run your .exe from a cmd prompt.

Enjoy!
Dustin
http://dustinbreese.blogspot.com/

Thursday, February 14, 2008

Virtualbox Being Purchased By Sun

Not sure yet if this is good or bad, but Innotek, the developer brains behind VirtualBox, just announced that Sun Microsystems is purchasing them. I'm betting its a GOOD thing. I've been a _very_ happy user of VirtualBox for over a year now. I use it on Ubuntu. I've found that it has outperformed VMWare Server/Player/Workstation in most of my observations. In the press release, Sun's intentions are that VirtualBox will continue to be aimed at the developer workstation.

Sun already has [recently] entered the server virtualization market with their xVM product. xVM is aimed at server virtualization and I'd bet good money it isn't cheap.

I'm anxious to find out how Sun will market VirtualBox to additional developers.

Things I like about VirtualBox --
1) User experience. Fast. I have no issues with Virtual Box's performance. I recall the last time I rebuilt my virtual machine, I was able to re-install WinXP in about 30 minutes. Seems that for VMWare Workstation 5.5, it always took 2 hours.

2) Shared folders. Fast. Easy. VMWare drives me nuts -- there is a 10 second pause the first time you access a shared folder. That 10 seconds doesn't seem like a lot, but I always catch myself thinking -- "What is faster? Copy to a USB disk or shared folders?" VirtualBox is fast and without delay.

3) Stability. I've had a few BSOD using VirtualBox, but is that because of Windoze or VirtualBox? I'll never know.

4) Free. VMWare has Server and Player versions which are free, but, especially in the case of Player, they are very stripped down. VirtualBox is free. Please keep it that way, Sun.

Anyways, I surely appreciate the developers at Innotek. They've done a fantastic job and I hope Sun treats them well!

Friday, February 08, 2008

Enunciate and REST (with the BT SDK)

In my earlier post, I briefly took a look at enunciate. I was impressed about Ryan's quick comments -- thanks, Ryan!

In this post, I want to further explore how one can use enunciate to provide a RESTful API. To explore, I'm going to use enunciate to put a quick RESTful api for sending a text message on top of the easy-to-use BT SDK.

The BT SDK is a toolkit you can use to interact with BT's global telecom network. It boasts doing things with a single line of code -- sending text sms messages, creating point-to-point calls (both SIP and traditional land lines), conference calls with multiple participants, call-flow/IVR functionality, and more. The SDK is available for Java, .NET, PHP, Python (and a PERL and Ruby version is available if you ask nicely :) It literally should take no more than 15 minutes to get up and running.

Steps:

  • First, go and download the Java BT SDK (you'll have to register which takes 1 minute or less)
  • Unzip the SDK into a directory (BTSDK_HOME)
  • Create a project skeleton in Eclipse with a "lib" directory which contains all of the BTSDK_HOME/lib/*.jar files as well as the BTSDK_HOME/Web21C-JavaSDK-5.0.jar.
  • Copy in ENUNCIATE_HOME/enunciate-full-1.6.jar into the lib directory.
  • Add all jars in the lib directory to your classpath in Eclipse.


Create an "api" and "impl" package in your source folder. In the api package, create the interface as follows:


package com.db.btsdkexamples.api;

import javax.jws.WebService;

import org.codehaus.enunciate.rest.annotations.Adjective;
import org.codehaus.enunciate.rest.annotations.Noun;
import org.codehaus.enunciate.rest.annotations.RESTEndpoint;
import org.codehaus.enunciate.rest.annotations.Verb;
import org.codehaus.enunciate.rest.annotations.VerbType;

@RESTEndpoint
@WebService
public interface MessagingInterface {
@Verb ( VerbType.update )
@Noun ( "message" )
public void sendMessage(
@Adjective(name="endpoint") String endpoint,
@Adjective(name="message") String message);
}


To tell enunciate to produce a RESTful api, all it takes is to put the @RESTEndpoint annotation on the interface and the impl. This annotation just tells enunciate that the methods will be exposed as REST endpoints. The additional method and parameter annotations dictates HOW enunciate exposes the api. Note, that even though I am not interested in creating a SOAP-based web service, I still had to put the @WebService annotation on the interface and the impl class.

The other annotations we need to discuss are on the method and the parameters.

The @Verb annotation dictates what HTTP METHODs must be used. REST is based exclusively upon the HTTP protocol and heavily uses HTTP GETs and POSTs. GET and POST is the most heavily utilized where POST is typically overloaded to also provide PUT and DELETE functionality. This is traditionally due to lack of browser and firewall support for anything other than GET and POST. The @Verb parameter just dictates what HTTP METHOD value will be used to interact with this service. In our example, VerbType.update means an HTTP POST must be used versus an HTTP GET.

The @Noun annotation effectively dictates what "resource" will appear in the URL. For example, a value of "Customer" would indicate the URL will be in the form of "http://localhost/rest/Customer".

Together with a @Verb of VerbType.update and @Noun of "message", this indicates that an HTTP POST to "http://localhost/rest/message" will be mapped to this method.

Next question, how do we map HTTP parameters to method parameters? There are two ways -- a Named Resource (ProperNoun) or standard HTTP query string. I wish there was a third way -- URL Mapping to parameters (maybe there is a way?)

ProperNoun works by taking the last part of the URL to map to a single method parameter. For example, http://localhost/rest/message/17195551212 could map the "17195551212" part of the URL to the "endpoint" parameter. The "message text" would need to be passed as a query parameter. This approach is handled by the @ProperNoun annotation. Note, however, that only a single @ProperNoun annotation can be specified.

HTTP Query parameters (or post data) is the second approach. This is the approach I used in the example above. It effectively means that the named query parameters will be mapped to the given method parameters. The names do not need to match. In my example above, an HTTP POST to http://localhost/rest/message with post data containing "endpoint=17195551212&message=some+message+text" would be necessary to invoke the method. Invoking from cmd line looks like this:


$ curl -d 'endpoint=17195551212&message=test' http://localhost:8080/btsdkexample/rest/message


Similarly, if I had used a @Verb of VerbType.read, then I would be able to just tack on the query-string parameters to the end of the URL and do a simple HTTP GET:


$ curl http://localhost:8080/btsdkexample/rest/message?endpoint=17195551212&message=test


I haven't noticed if there is a way to map a more complex URL to multiple query parameters. For example, I'd like to be able to map customer-id AND order-id to corresponding method params for something like this: http://localhost/rest/customer/custid123/orders/ord9988. Please tell me if this breaks your idea of a REST uri.

Next, we need to create the implementation class as follows in the impl package:


package com.db.btsdkexamples.impl;

import javax.jws.WebService;

import org.codehaus.enunciate.rest.annotations.RESTEndpoint;

import com.db.btsdkexamples.api.MessagingInterface;

@RESTEndpoint
@WebService

public class MessagingImpl implements MessagingInterface {

public void sendMessage(String endpoint, String message) {
System.err.println("Sending message to " + endpoint + " == " + message);
new com.bt.sdk.capabilities.messaging.oneway.MessagingOneWayManager().sendMessage(endpoint, message);
}

}


Now that we have [almost] everything done, we need to enable the BT SDK. To do this requires a simple properties file and a private key/certificate. You can obtain the the key and certificate by using the Certificate Tool at https://web21c.bt.com/registered_applications/new.

Go ahead and just generate one for the Sandbox environment (it's free, but you can only have 5 sandbox certs which are valid for 1 month each, plus you have limited number of messages you can send in a single day).

Save the generated PKCS12/PFX file to your "src" directory. Don't forget your password!

Now, create security.properties in the "src" directory as follows and plug in the value for your password below and the name of your key file.


org.apache.ws.security.crypto.provider=com.bt.security.PKCS12Crypto
org.apache.ws.security.crypto.merlin.keystore.type=pkcs12
org.apache.ws.security.crypto.merlin.keystore.password=yourpass
org.apache.ws.security.crypto.merlin.alias.password=yourpass
org.apache.ws.security.crypto.merlin.file=YourPrivateKey_in_src_folder.pfx

#constants.provider=com.bt.sdk.common.ProductionConstants
constants.provider=com.bt.sdk.samples.SandboxEndpoints


You are literally minutes away from testing!

Now, we just need to create a special enunciate.xml config file that tells enunciate to bundle up your security.properties file and key file into the WAR in the WEB-INF/classes directory.

Create enunciate.xml in the project root:


<?xml version="1.0"?>
<enunciate label="btsdkexamples">
<modules>
<spring-app compileDebugInfo="true">
<copyResources dir="src" pattern="*.properties"/>
<copyResources dir="src" pattern="*.pfx"/>
</spring-app>
</modules>
</enunciate>


Now, you will need your build.xml, so here it is, pretty much identical to my last post:

<project name="btsdkexample" default="package">

<target name="init">
<property name="enunciate.home" value="/home/dbreese/bin/enunciate-1.6" />
<property name="jdk.home" value="/opt/java/" />

<path id="enunciate.classpath">
<fileset dir="${enunciate.home}/lib">
<include name="**/*.jar" />
</fileset>
<fileset dir="${enunciate.home}">
<include name="enunciate-full-*.jar" />
</fileset>
<fileset dir="${jdk.home}/lib">
<include name="tools.jar"/>
</fileset>
<fileset dir="lib">
<include name="**/*.jar" />
</fileset>
</path>

<taskdef name="enunciate" classname="org.codehaus.enunciate.main.EnunciateTask">
<classpath refid="enunciate.classpath" />
</taskdef>

</target>

<target name="clean">
<delete dir="dist"/>
</target>

<target name="package" depends="clean,init">
<mkdir dir="dist"/>
<enunciate basedir="src" configFile="enunciate.xml">
<include name="**/*.java" />
<classpath refid="enunciate.classpath" />
<export artifactId="spring.war.file" destination="dist/${ant.project.name}.war" />
</enunciate>
</target>
</project>


Run the build, copy the war file to your container (for me it's JBOSS_HOME/server/default/deploy), and test with the following. The format of "endpoint" is "tel:+" + 2 digit country code + tn. (%2B is urlencoding for a plus sign!)


curl -d 'endpoint=tel:%2B17195551212&message=test' http://localhost:8080/btsdkexample/rest/message


Returning more complex data types


In the above example, our method return type was void. What about returning a complex data type? This is also easy using JAXB 2.0 annotations. The only requirement is that the return type must be annotated with @XmlRootElement.

Let's return a simple data type called "MyMessageStatus" which simply contains the telephone nbr, the message, and the message id returned from the BT SDK. (Yeah, I know my naming conventions suck.)


package com.db.btsdkexamples.business;

import javax.xml.bind.annotation.XmlRootElement;

@XmlRootElement
public class MyMessageStatus {
public String endpoint;
public String message;
public String btMessageId;

public MyMessageStatus(String endpoint, String message, String messageId) {
this.endpoint = endpoint;
this.message = message;
this.btMessageId = messageId;
}

public MyMessageStatus() {
// satisfy no-arg requirement
}
}


And modify the interface and impl class to return an object instead of void (only IMPL class method shown here):


public MyMessageStatus sendMessage(String endpoint, String message) {
System.err.println("Sending message to " + endpoint + " == " + message);
Message msg = new com.bt.sdk.capabilities.messaging.oneway.MessagingOneWayManager().sendMessage(endpoint, message);
return new MyMessageStatus(endpoint,message,msg.getMessageId());
}


Run the build, deploy, and test:


$ curl -d 'endpoint=tel:%2B17192137681&message=test' http://localhost:8080/btsdkexample/rest/message

<?xml version="1.0" encoding="UTF-8" standalone="yes"?>
<myMessageStatus>
<endpoint>tel:+17192137681</endpoint>
<message>test</message>
<btMessageId>e385b6e38eac4de9567a3c2e76b51729at</btMessageId>
</myMessageStatus>


Some restrictions I've run across with the return types:
1) It is not possible to have a complex class type as a method parameter; therefore, I had to modify my method signatures to use only Strings and simple data types.

2) enunciate does not [yet] support returning collections, so to return a collection, it appears, you'd need to wrap it with a class.
Thursday, January 31, 2008

Enunciate!

Overview
Starting from scratch to write a web service, getting a WAR built, deployed into JBoss or your favorite container can be a pain. I always start with an existing ant script and project, remove all the existing artifacts, then start fresh. This means, typically, an hour or so of deleting unneeded jars/classes/relics, search-n-replacing, fixing built script to remove any references to the old project-specific crud, deploying to my container to test a simple hello-world-ish app.

I hate doing this "setup" type work. It's boring and lame. .NET makes it really easy to startup a new project, so why do I hate doing it in Java?

So, what options are there for Java? One I have recently run across is Enunciate from our XFire friends at CodeHaus.

Enunciate appears to solve a nice little java pain point -- "How can I rapidly deploy a webservice without bothering with all the infrastructure crud?"

With a few simple JSR 181 annotations, and using enunciate, you can quickly wrap up a complete, deployable WAR which contains a WS-I Basic Profile compliant web service, nice browsable service documentation, client code in the form of a JAR, WSDL, etc.

If it sounds like a lot of effort, don't be fooled. I loosely followed the enunciate Quick Start and had my own simple web service up and running within a few minutes. This included setting up the eclipse project, downloading and unpacking enunciate, creating the ant build script, deploying to JBoss, and playing with the created application.

Let's go through a quick example on setting up enunciate, building a sample project, and deploying it to JBoss.

Enunciate is very module. In fact, all of the default functionality is provided via a set of modules that come with enunciate out of the box. If there is a deployable artifact that you want and there isn't a module for your desired functionality, then you are free to create your own module and donate it back to the project.

Getting Set Up
I'll assume you already have a JDK, IDE, and a container installed. Download enunciate from http://enunciate.codehaus.org/downloads.html. The latest at the time of this post is 1.6, release on January 8, 2008. The download is only 9.2 megs.

Extract the archive to some location. I extracted it to $HOME/bin.

If you want to run enunciate from cmd line versus ant script, then add enunciate/bin to your path. I'm going to walk through setting up enunciate as an ant task.
PATH=$PATH:$HOME/bin/enunciate-1.6/bin
Example Project
My sample project doesn't vary much from the enunciate Quick Start. I just like to try things myself in hopes that I hit something new. The example project I quickly thought of is a music service which will have admin and search capabilities for artists, albums, and songs. It is pretty simple, but just to illustrate the simplicity of enunciate and how it can handle some complexities of a "real-world" example.

My example will have artists who can have zero-or-more albums which can have zero-or-more songs. The service will allow adding relationships and searching.

First, I created the project structure and created the simple directory structure:
src
|----build.xml (I'll be using ant)
|----com
........|----music
................|----api
................|----domain
................|----impl
api -- contains interfaces and exceptions which define the exposed service
model -- contains business models and relationships
impl -- implementation classes for the interfaces

Next, I defined the interface for the service. The service will be simple and define the following operations. Note the @WebService annotation (from jsr-181)

import javax.jws.WebService;

import com.music.model.Album;
import com.music.model.Artist;
import com.music.model.Song;

@WebService
public interface MusicServiceInterface {
public Artist addArtist(Artist artist) throws AlreadyExistsException;
public Album addAlbum(Artist artist, Album album) throws AlreadyExistsException;
public Song addSong(Album album, Song song) throws AlreadyExistsException;
public Song[] searchSongs(String someSearchText);
}

Now create skeletons for Album, Artist, and Song as well as AlreadyExistsException, just to get things to compile. For this example, I'm NOT interested in implementing the actual functionality of a music search service; instead, I am only interested in how we expose a service quickly using enunciate.

Next up is to define the implementation class as follows. Note the reference to the implementation class in the @WebService annotation.

import javax.jws.WebService;

import com.music.api.AlreadyExistsException;
import com.music.api.MusicServiceInterface;
import com.music.model.Album;
import com.music.model.Artist;
import com.music.model.Song;

@WebService (
endpointInterface = "com.music.api.MusicServiceInterface"
)
public class MusicServiceImpl implements MusicServiceInterface {

public Album addAlbum(Artist artist, Album album)
throws AlreadyExistsException {
// TODO Auto-generated method stub
return null;
}

public Artist addArtist(Artist artist) throws AlreadyExistsException {
// TODO Auto-generated method stub
return null;
}

public Song addSong(Album album, Song song) throws AlreadyExistsException {
// TODO Auto-generated method stub
return null;
}

public Song[] searchSongs(String someSearchText) {
// TODO Auto-generated method stub
return null;
}

}

Now I have a compilable, but not-yet-functional application. Let's go ahead and see what happens when we use enunciate to create the WAR artifact and deploy it to JBoss.

I want to use ant for this example, so here's a sample build.xml file that you can modify to meet your needs:

    <project name="music-enunciate-example" default="package">

<target name="init">
<property name="enunciate.home" value="/home/dbreese/bin/enunciate-1.6" />
<property name="jdk.home" value="/opt/java/" />

<path id="enunciate.classpath">
<fileset dir="${enunciate.home}/lib">
<include name="**/*.jar" />
</fileset>
<fileset dir="${enunciate.home}">
<include name="enunciate-full-*.jar" />
</fileset>
<fileset dir="${jdk.home}/lib">
<include name="tools.jar"/>
</fileset>
</path>

<taskdef name="enunciate" classname="org.codehaus.enunciate.main.EnunciateTask">
<classpath refid="enunciate.classpath" />
</taskdef>

</target>

<target name="clean">
<delete dir="dist"/>
</target>

<target name="package" depends="clean,init">
<mkdir dir="dist"/>
<enunciate basedir="src">
<include name="**/*.java" />
<classpath refid="enunciate.classpath" />
<export artifactId="spring.war.file" destination="dist/${ant.project.name}.war" />
</enunciate>
</target>
</project>


NOTE: I ran into an issue where it was complaining about "java.lang.NoClassDefFoundError: com/sun/mirror/apt/AnnotationProcessorFactory". To fix, I had to add jdk.home/lib/tools.jar to my classpath. I literally spent 50% of my time on this sample project trying to fix this stupid little error!

Notice the "artifactId" which is "spring.war.file". This indicates that a fully functional WAR FILE will be created. Another possible value is "spring.war.dir" which is an exploded WAR directory.

Enunciate can also produce FLEX-compatible artifacts.

Build the project by running "ant package".

Once it is successfully built, deploy dist/music-enunciate-example.war to your container. Since I'm using a default instance of jboss, I just copy it into $JBOSS_HOME/server/default/deploy and JBoss will deploy it.

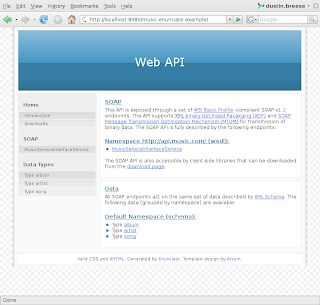
Now, open your browser and hit "http://localhost:8080/music-enunciate-example". You should see the following sample page:


The web page has all the complete documentation, wsdl, and even includes a downloadable client.

Documentation is generated directly from javadocs, so as long as you follow good javadoc practices, the html documentation generated by enunciate will be great.

Customization and Modules

You can provide a configuration file that allows you to personalize URLs, namespaces, package names, documentation pages, etc. The configuration file can be provided in the enunciate ant task with the configFile attribute, or the "-f" cmd line option. It appears enunciate also makes use of a "package-info.java" class for annotations which will drive namespaces, documentation, etc.

Enunciate can be extended with modules. The core functionality of enunciate is implemented with modules. For example, the xfire-client module is responsible for generating the downloadable xfire client. The enunciate configuration file has a section which is used to configure each module. Check out this link for information on the core modules that come with enunciate.

REST
Enunciate can also generate restful services for you. This is accomplished using the "rest" module. (See Constraints enunciate places on exposing REST models)

I want to dive more into how enunciate can help with REST APIs in a future article.

Misc Questions
  1. WTF is "artifactId" in the enunciate ant target? Here's a good link which articulates what is available.

Some things I still want to investigate:
  1. How easily is it incorporated into existing projects?
    It seems that you can easily incorporate enunciate into existing projects, but you'd then have multiple ways of exposing your web services which adds project complexity.
  2. Can it handle WSDL/contract-first development?
    Enunciate is more aimed at code-first approach. Still trying to get mind around it and see if WSDL-First is possible.
  3. How does it incorporate into ant/maven? Easy. Plus, see above for a working ant script using the enunciate task.

Friday, January 04, 2008

Synergy -- Sharing a single keyboard and mouse

Synergy is a nifty little software package I just started using. It hasn't been very active for over a year, but what it provides is EXACTLY what I've needed for a long, long time.

My office desk at home is a corner/L-shaped desk with "hidden" drawers for the keyboard. I hate these hidden keyboards (or at least mine!) because my hand can't fit into the crack to grab the mouse to use it effectively. I do consider myself a fast and efficient typer, but I don't really follow a good form; therefore, reaching into a crevice at an odd angle and trying to get my bearing on a hidden keyboard is quite a challenge.

About the only thing I use my desktop for is for editing my digital photos (Canon 40D, in case you were wondering), editing some simple video of the family, and of course, playing my music from iTunes.

I work at home about 60% of the time and have a nice laptop. There are many times when I want to switch over to my desktop and do a simple quick task such as just changing the song, etc. But I'm lazy and dread scooting back my chair, pulling out the keyboard and mouse, changing the song, and then putting everything back into place.

Solution: Synergy! Synergy allows you to set up screen edges to control multiple other computers. You specify one keyboard and mouse that controls them all. Best of all, it runs on just about any OS, including Mac OS 10.2+.

I run Ubuntu 7.10 Gutsy Gibbon on laptop and Windows, so these steps are more tailored for a linux server, but it looks very trivial to set up a Windows Synergy server, too.

Step 1: Determine which computer will act as the controller ("server" in Synergy)

Step 2: Download and install Synergy on all computers you want to control.
For Ubuntu, it is as easy as "sudo apt-get install synergy"

For Windows, just run the executable.

Step 3: Configure the server
My server will be Ubuntu. The config file is located in my $HOME directory:
$ cat .synergy.conf
section: screens
ulaptop:
desktop:
end
section: links
ulaptop:
right = desktop
desktop:
left = ulaptop
end

What the config file shows is 1) what servers/clients you have and 2) how they fit together.

"section:screens" shows that I have only two computers: my server (ulaptop) and one client (desktop).

"section:links" shows where the displays are located in respect to each other. For example, for my laptop, the desktop is on the right. Vice versa, for my desktop, my laptop is on the left.

To configure a Windows Synergy server, launch Synergy and select the "Share this computer's keyboard and mouse (server)" option and then click the "Configure..." button.

These settings just tell Synergy which edges of which screens will cause transfer of the mouse and keyboard to the other computer.

Step 4: Start the server
For linux, $ synergys

For Windows, launch Synergy and select "Share this computer's keyboard and mouse (server)" option.

Step 5: Start the clients
Specify the IP address of the Synergy server. There is a test mode on the Windows client which will indicate if a successful connection is made.

Step 6: Install synergy client as a service
Optionally, you can click the "AutoStart..." button and configure Synergy as either a log-in service or a system service for Windows clients.

That's it! Took me about 10 minutes the first time I tried it and now LOVE it!

Blogging New Year!

I'm promising myself I'm going to do a better job at blogging and putting some useful, thought-inspiring content out here in 2008.

Gotta get into the practice of doing what I should have been doing for years!

Prior to this posting, you'll find a lot of useless crap; mainly just some notes I took while figuring out things in Linux, Development, etc. I figured I'd jot it down on my personal BLOG. From time-to-time I get an email letting me know it helped someone, but you'll probably find it useless.

We'll start with a quick technical note about Synergy.